A well-organized craft room does more than look pretty on Pinterest. It changes how you create. When your supplies are easy to find, you spend less time searching and more time making. Whether you’re working with a spare bedroom, a closet, or just a corner of your living room, smart organization turns any space into a creative haven. These 30 ideas are practical, budget-friendly, and easy to pull off — no major renovation required. Pick one or try them all. Your best creative work starts with a space that works for you.
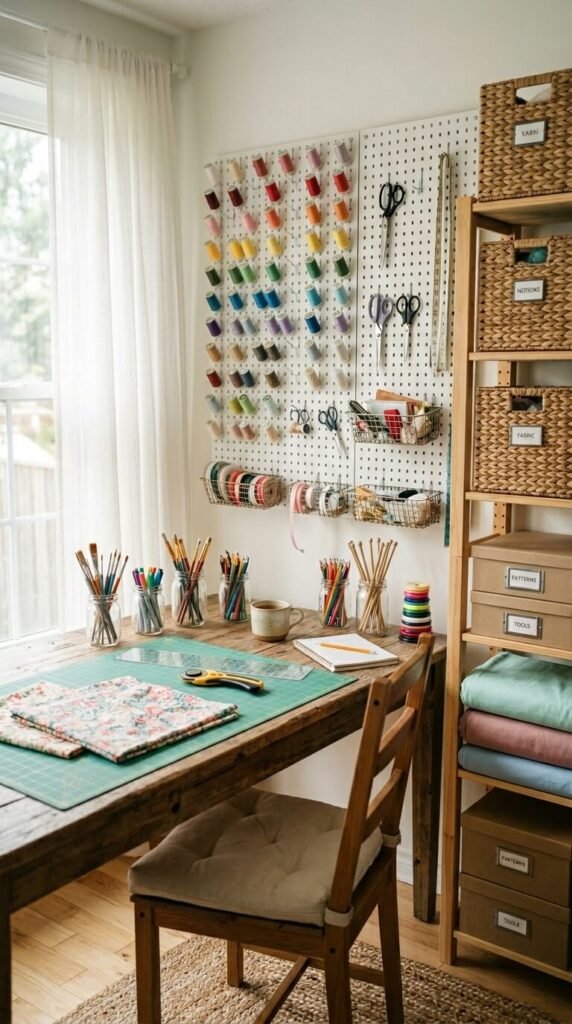
1. Pegboard Power Wall
A pegboard is one of the best investments for any craft room. It keeps tools visible, reachable, and off your desk. You can buy a standard pegboard at any hardware store for under $30. Paint it white or a soft color to match your room. Add hooks, small baskets, and tiny shelves. Hang scissors, rulers, tape, and ribbon spools right on the board. Rearrange whenever your needs change. It grows with your hobby.
2. Color-Coded Supply Bins
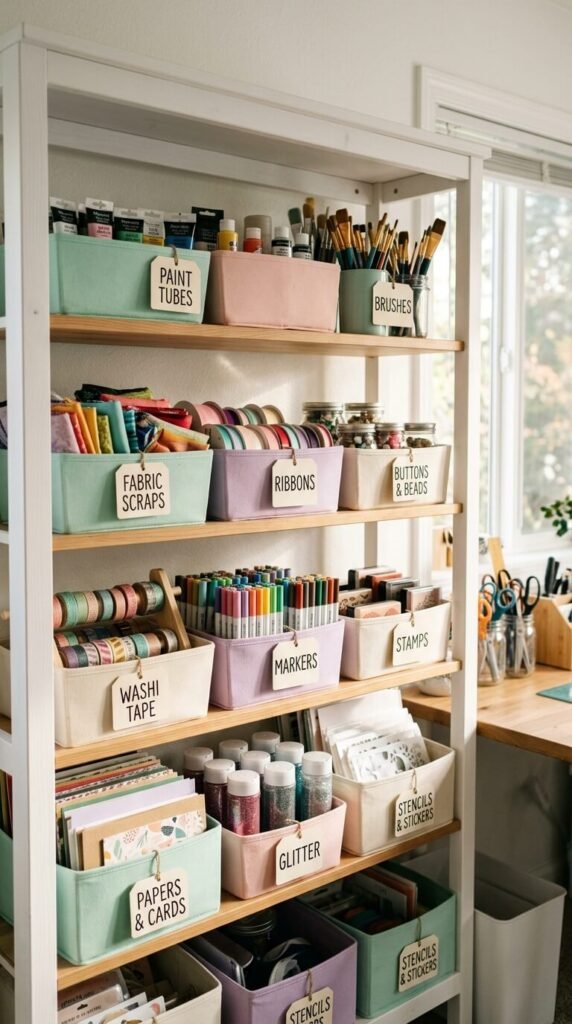
Sorting supplies by color is both practical and beautiful. Use small bins, baskets, or boxes in matching tones. Group similar items together — all greens in one bin, all reds in another. This works especially well for yarn, washi tape, cardstock, and thread. Dollar store bins work perfectly. You don’t need anything fancy. The visual organization helps your brain relax. You’ll always know where to look. It also makes the room feel curated and calm.
3. Repurposed Bookshelf Display
An old bookshelf from a thrift store or garage sale can become your craft room’s backbone. Sand it, paint it, and style it to match your space. Use the shelves to store labeled bins, stacked notebooks, fabric rolls, and jars of supplies. Mix open storage with small baskets to hide clutter. This approach costs very little and makes a big visual impact. Look for bookshelves at secondhand shops for $10–$30. A fresh coat of paint makes them look brand new.
4. Mason Jar Supply Station
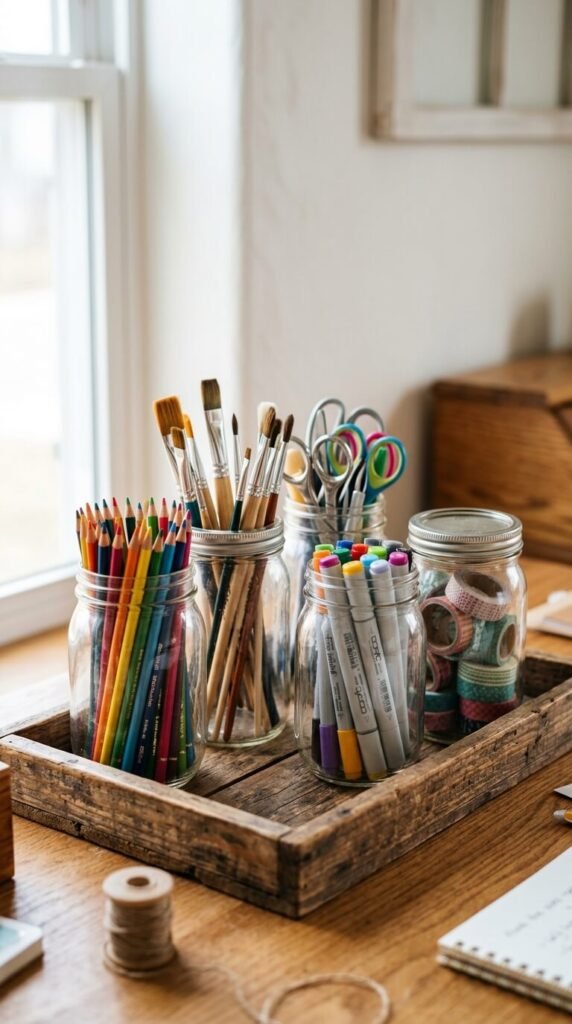
Mason jars are cheap, clear, and endlessly useful. You can see exactly what’s inside without opening anything. Group them on a wooden tray or lazy Susan so everything stays together. Use them for pens, markers, brushes, scissors, craft knives, and ribbon. Collect jars for free by reusing pasta sauce or pickle jars. Paint the lids for a cohesive look. A set of six jars on a tray costs almost nothing and creates a beautiful, functional supply station.
5. Floating Shelf Gallery Wall

Floating shelves free up floor space while keeping supplies within arm’s reach. Install them at different heights to create visual interest. Use the top shelves for display, lower shelves for daily tools. Style them with a mix of storage boxes, small plants, and decorative pieces. IKEA and Amazon both sell affordable floating shelves. You can install a basic set for under $40. They’re easy to mount yourself with a level and a drill. Clean, minimal, and completely practical.
6. Labeled Clear Drawer Organizers
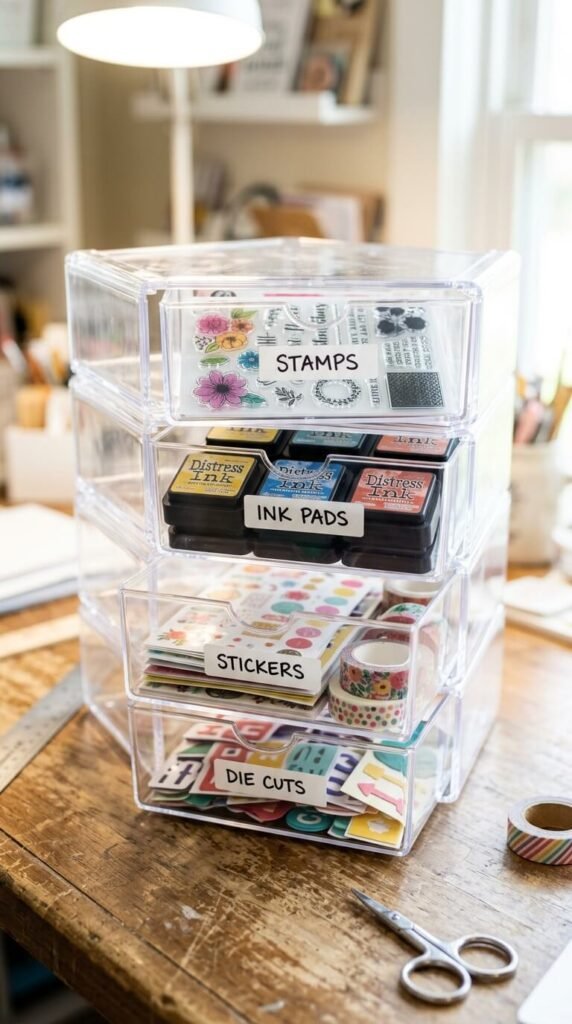
Clear stackable drawers are a game-changer for small supplies. You can see everything at a glance without pulling anything out. These are ideal for stamps, stickers, die cuts, ink pads, and embellishments. Add a simple handwritten label to each drawer. Dollar Tree and IKEA both carry affordable versions. Stack them on your desk or a shelf. Organize by category so restocking is quick and easy. This system works especially well for crafters who work with lots of small pieces.
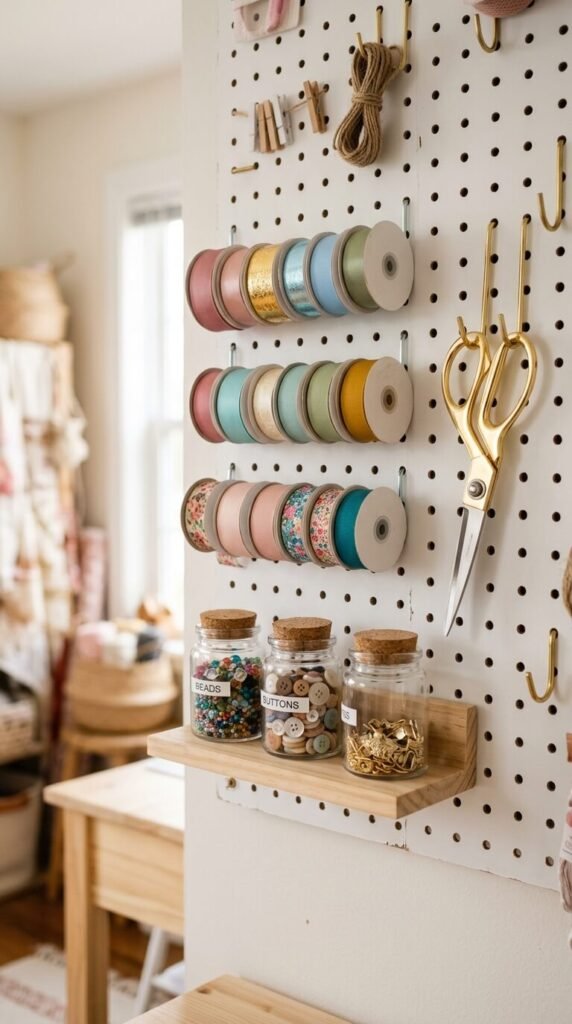
7. Ribbon and Washi Tape Dowel Rod Display

Washi tape and ribbon are beautiful and deserve to be shown off. Mount a wooden dowel rod between two hooks on the wall and slide all your spools directly onto it. The supplies become décor. You can see every pattern without digging through a drawer. Dowel rods cost under $5 at any hardware store. Sort by color for an extra satisfying display. This is one of the easiest DIY organization projects you can do in under 30 minutes.
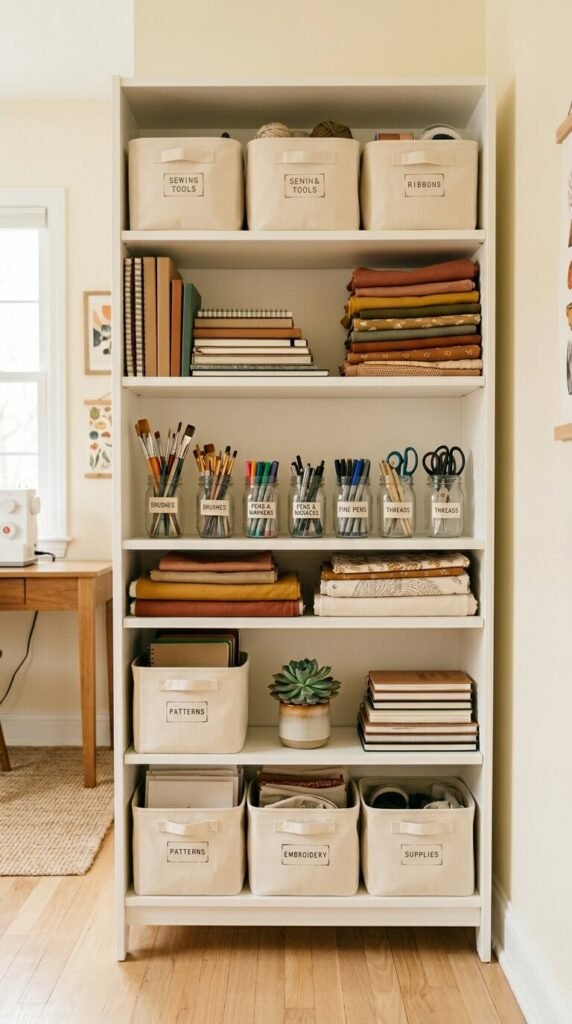
8. Stackable Craft Cube Storage
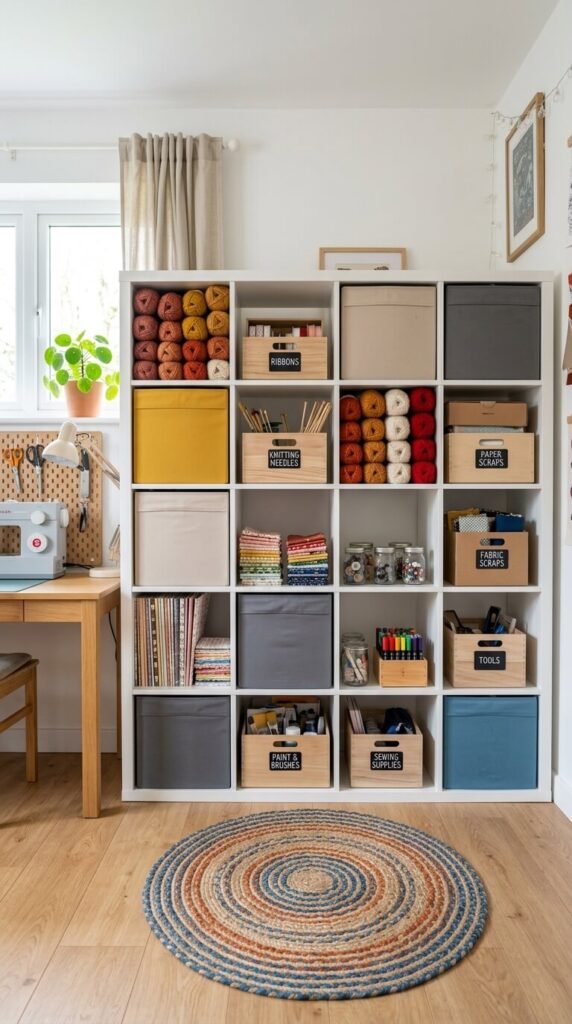
Cube shelving units are one of the most flexible storage options available. You can configure them in almost any shape to fit your space. Use fabric bins inside some cubes to hide clutter, and leave others open for display. These units work for yarn, paper, tools, fabric, and more. IKEA’s KALLAX is a popular choice, but similar options are available at Target or Walmart for less. Mix and match bin colors to keep the look cohesive and tidy.
9. Sewing Notions Wall Pocket Organizer
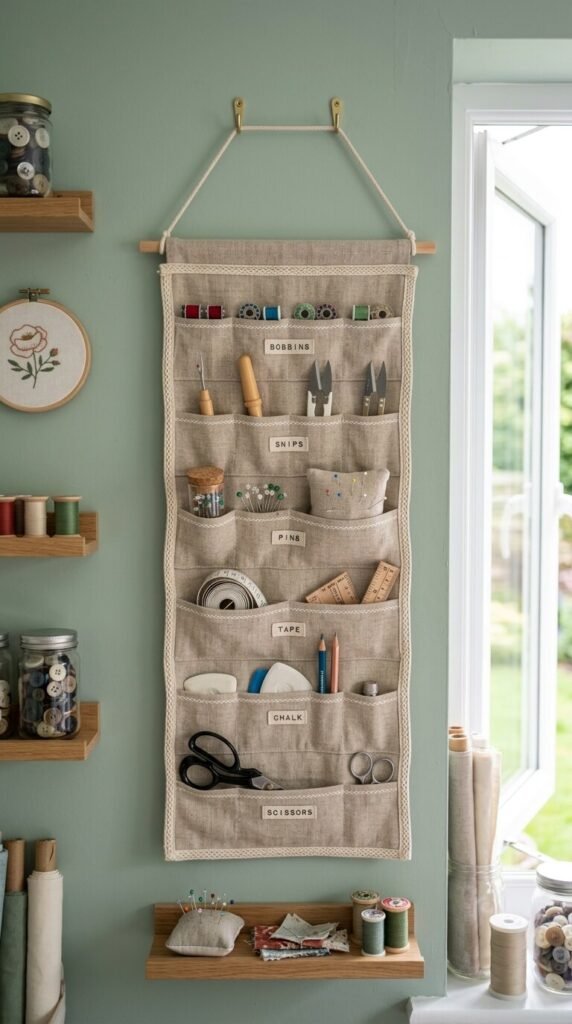
A wall-hanging pocket organizer is perfect for sewers and textile crafters. It keeps small tools flat against the wall and completely off your work surface. You can buy a fabric version or sew one yourself from canvas or linen. Fill the pockets with bobbins, seam rippers, measuring tape, chalk, and pins. This kind of organizer takes up zero floor space. Mount it right next to your sewing machine so everything is within easy reach during a project.
10. Vintage Ladder Supply Display
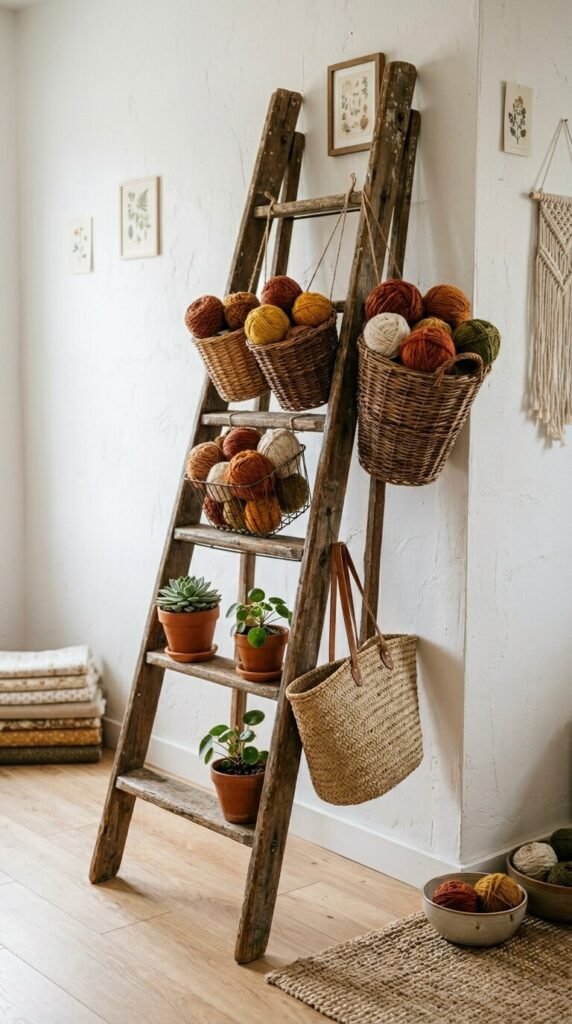
A wooden ladder leaned against a wall creates instant character and useful storage. Hang baskets or bins from the rungs to hold yarn, fabric, or rolled paper. Drape ribbon or twine across the steps for a decorative touch. You can find old ladders at flea markets, thrift stores, or garage sales for a few dollars. Sand it lightly and seal it to prevent splinters. This is one of the easiest no-drill storage solutions for renters or anyone who doesn’t want to put holes in walls.
11. Under-Table Rolling Cart Storage
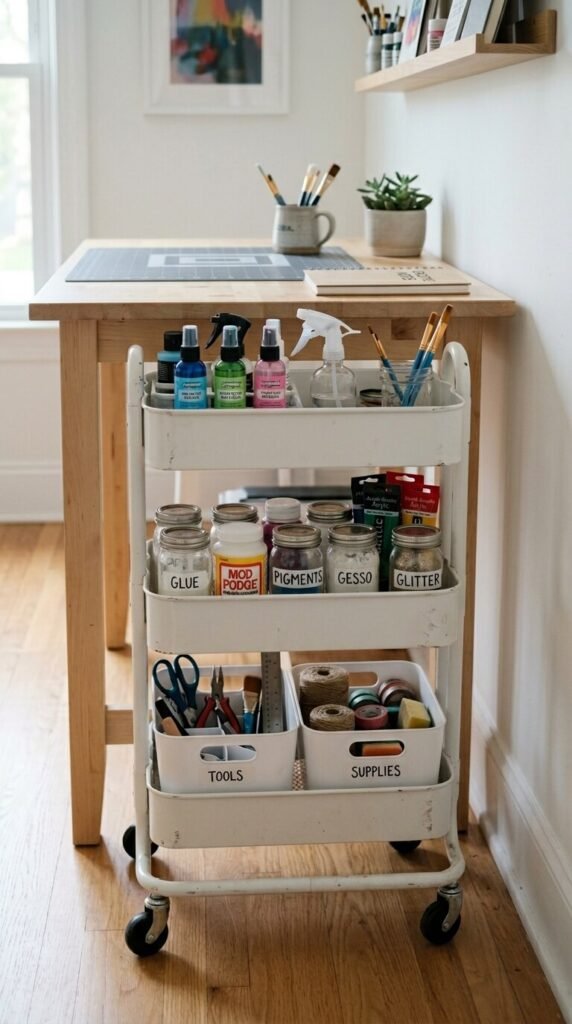
A rolling cart slides neatly under your craft table and pops out when you need it. This is perfect for small rooms where every inch matters. Use the shelves to store sprays, adhesives, scissors, and tools you grab constantly. IKEA’s RÅSKOG cart is a crafting community favorite and costs around $30. You can also find similar three-tier carts at Target or Amazon. Label each shelf so nothing gets mixed up. Roll it to your work area and tuck it away when you’re done.
12. Magnetic Knife Strip for Metal Tools

Magnetic knife strips aren’t just for kitchens. They work brilliantly for holding metal craft tools. Mount one above your desk to hold scissors, seam rippers, rotary cutters, metal rulers, and tweezers. Everything stays visible and off your work surface. Magnetic strips cost $10–$20 at most kitchen or home stores. You can also find them on Amazon. One strip holds a surprising number of tools. It’s one of the most underrated organization hacks for craft rooms.
13. Coordinated Labeled Binder System
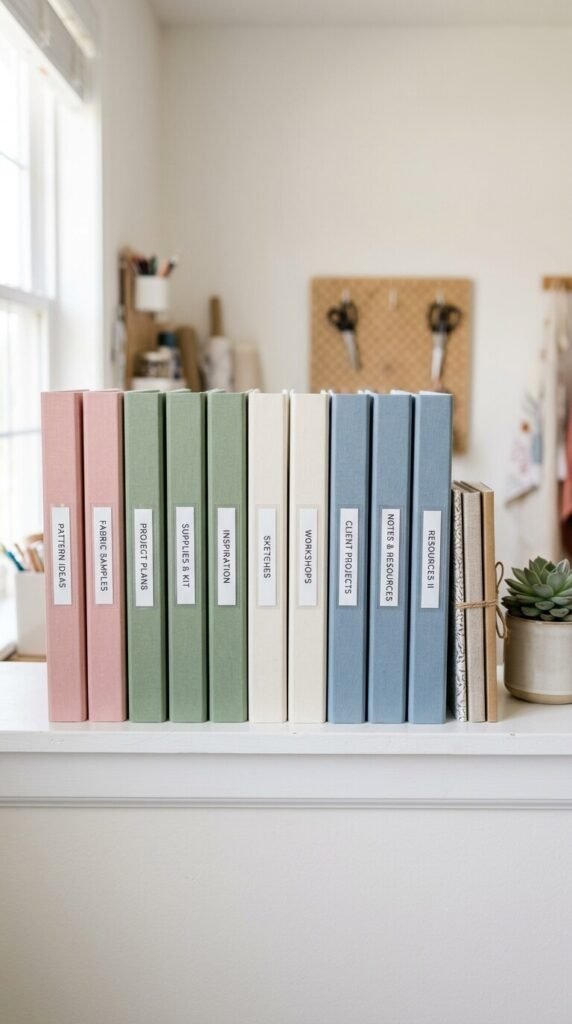
Binders are underrated in the craft room. Use them to store templates, patterns, stencils, printable designs, and inspiration clippings. Buy matching binders in a color that fits your room’s palette. Label each spine clearly. Use sheet protectors inside to keep papers flat and clean. This system is ideal for paper crafters, sewers, and anyone who works with patterns. A set of five binders costs under $15. Lined up on a shelf, they look organized and intentional.
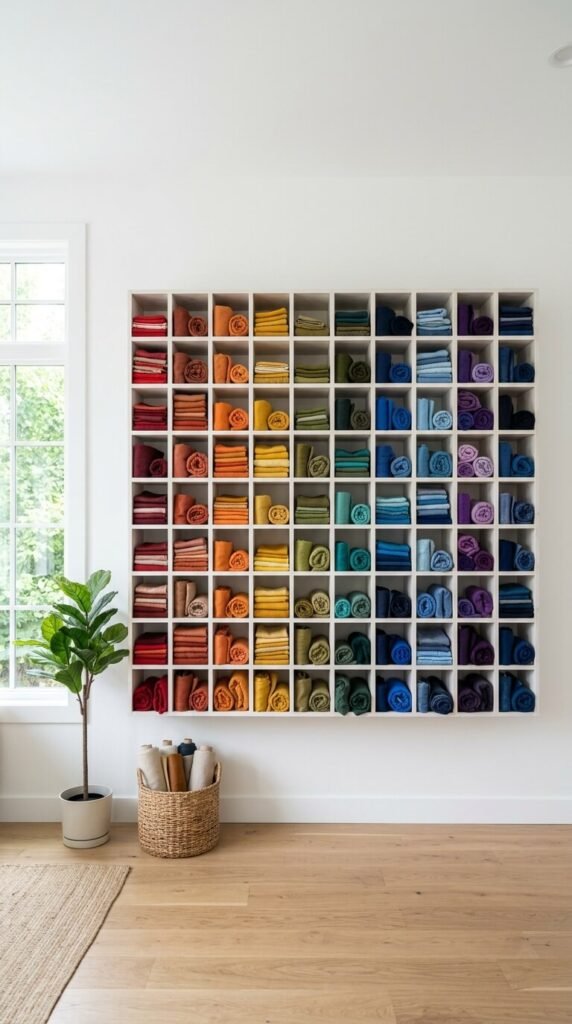
14. Pegboard With Shelf Inserts for Yarn
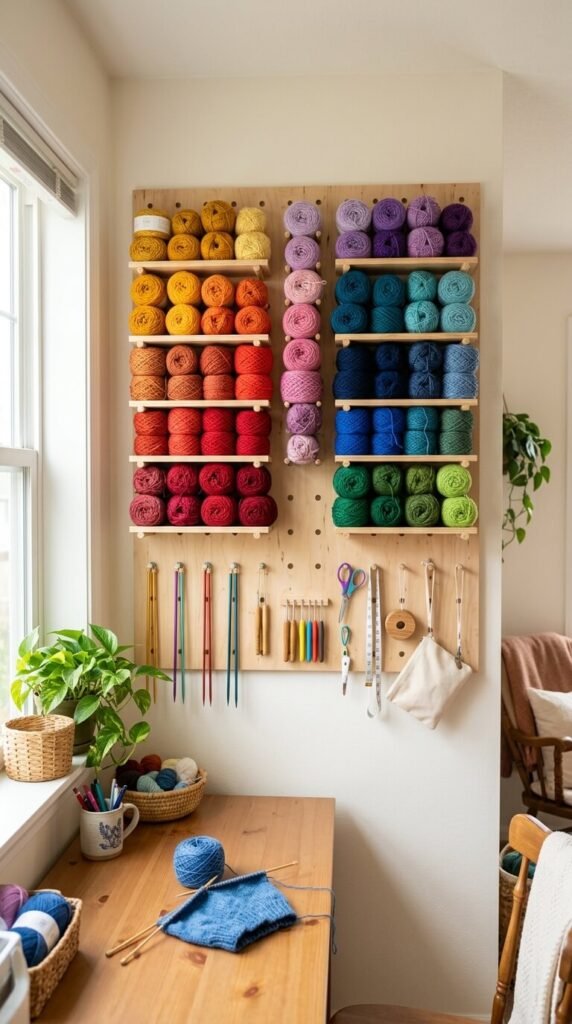
If you’re a yarn lover, a pegboard with horizontal shelf inserts is your dream setup. Organize yarn by color across the shelves for a wall that’s as beautiful as it is functional. You can see every skein, grab what you need, and keep your stash tangle-free. Buy wooden shelf inserts made for pegboards, or DIY your own with small wooden boards and L-brackets. The whole setup can cost under $50 and gives your yarn collection the display it deserves.
15. Clear Stackable Shoe Boxes for Supplies
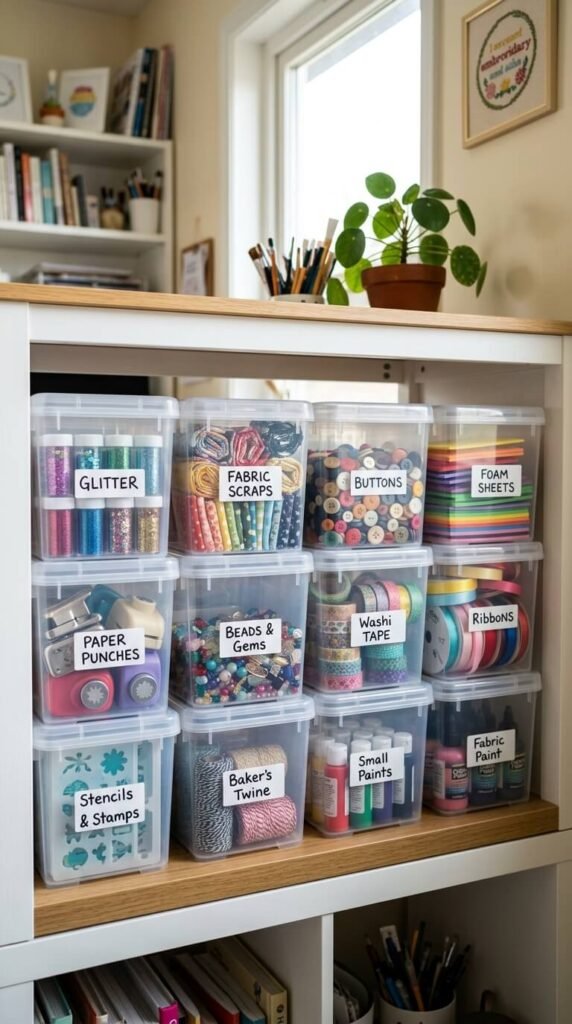
Clear shoe boxes are one of the most affordable craft storage tools available. They’re uniform, stackable, and completely see-through. Use them for fabric scraps, foam sheets, glitter, ribbon bundles, paper punches, and small embellishments. Add a label to the front of each box with a marker. You can buy packs of clear boxes at the dollar store or big-box retailers for very little. Stack them on shelves or inside a cubby unit. Simple, cheap, and surprisingly satisfying.
16. Dedicated Paper Storage Tower
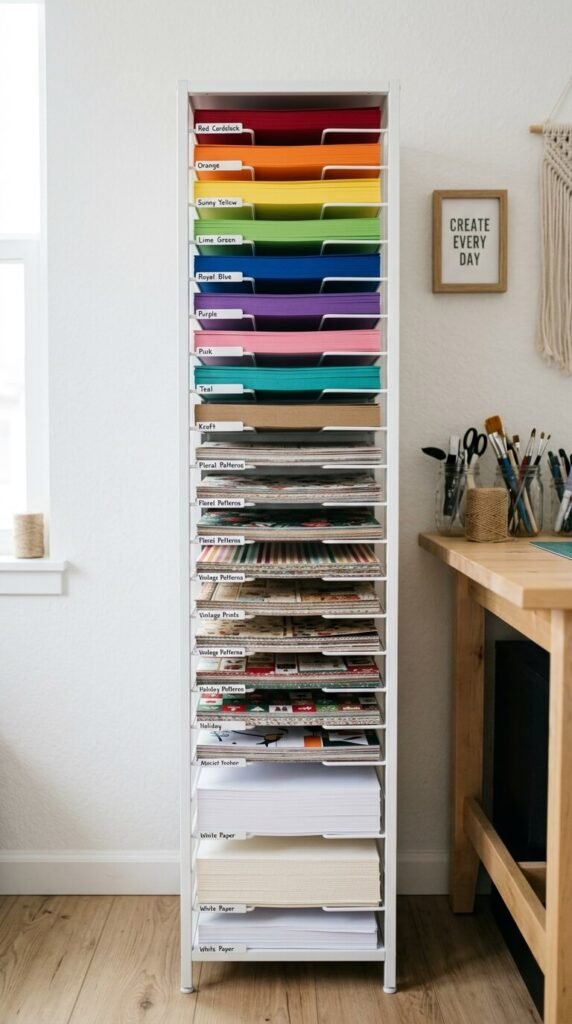
Paper is one of the hardest supplies to store neatly. It bends, wrinkles, and falls over constantly. A dedicated paper storage tower with horizontal slots solves this completely. Each slot holds a different type or color of cardstock, scrapbook paper, or printable sheets. These towers are available online for $20–$50 and are specifically designed for letter and A4 paper. Keep it right next to your desk so you can pull a sheet and get back to creating without any hassle.
17. Curtained Closet Craft Nook
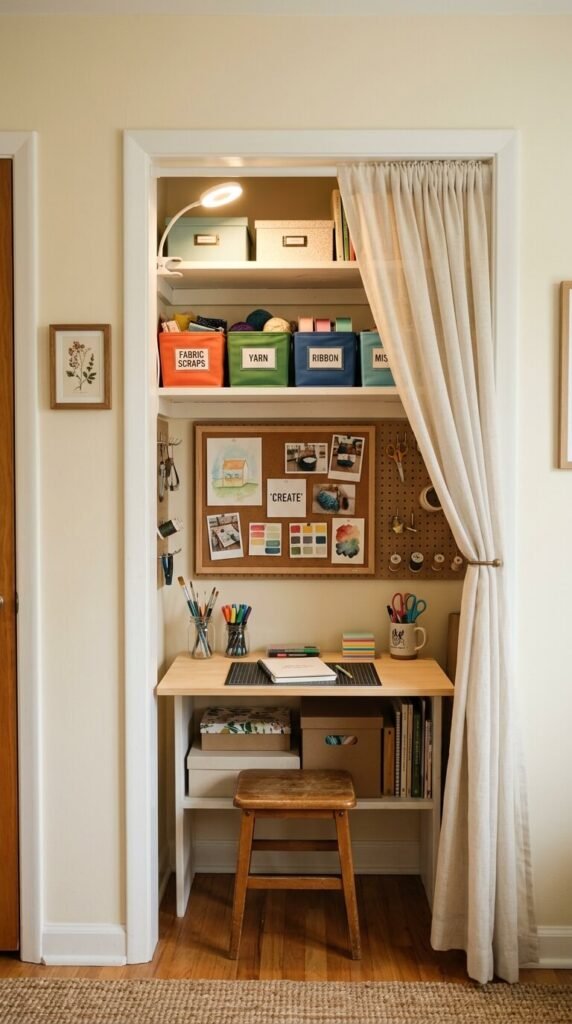
No dedicated craft room? Turn a closet into a hidden creative zone. Remove the doors and replace them with a curtain you can pull open when crafting and close when guests come over. Add shelves, a small folding desk, a corkboard, and a clip light. Paint the inside a fun accent color to make it feel special. This works even in a small apartment. Everything stays contained, and you get a real workspace that closes away completely when you need the room to look tidy.
18. Hanging Fabric Scrap Organizer
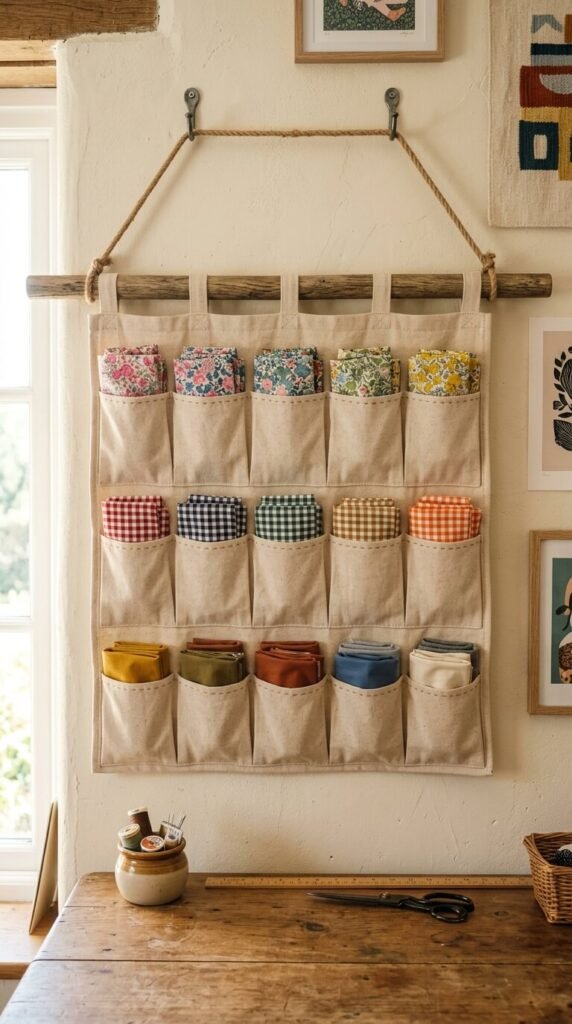
Fabric scraps are wonderful to have and a nightmare to store. A hanging canvas organizer with deep pockets keeps every scrap folded and visible. Organize by color, pattern, or fabric type. You can sew your own organizer from canvas fabric for almost nothing, or find one online for $15–$25. Mount it on a wall near your sewing area. It frees up drawer and bin space, keeps scraps from tangling, and makes it easy to grab just the piece you need for your next project.
19. Acrylic Desktop Organizer Set
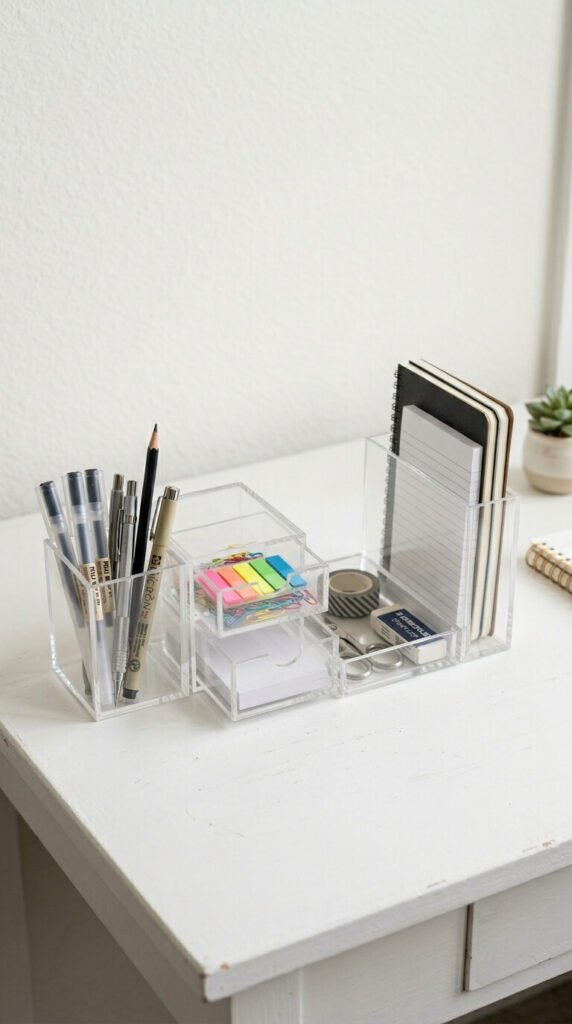
Acrylic organizers bring a clean, minimal look to your craft desk. Because they’re transparent, nothing ever feels hidden or chaotic. Use a matching set with a pen holder, small tray, drawer unit, and file slot. Keep your most-used daily tools right at the desktop level. Acrylic organizer sets are available on Amazon and at office supply stores for $20–$40. They’re easy to wipe clean and look sharp in any style of craft room, from modern to farmhouse to boho.
20. Chalkboard Label System
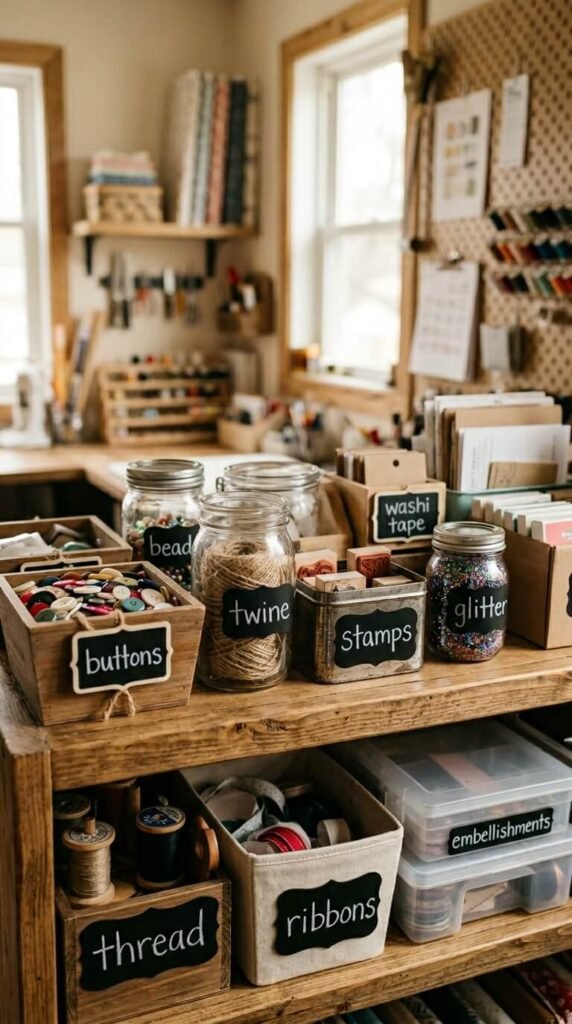
A consistent labeling system ties your entire room together. Chalkboard labels are especially popular because they’re reusable and easy to update. Write the contents in chalk pen, and wipe it clean when something changes. Stick them on jars, bins, baskets, drawers, and boxes. Packs of chalkboard labels are available at craft stores and on Amazon for $5–$10. This small step makes a huge difference in how organized your room feels — and it means anyone can find and return supplies correctly.
21. Sunlit Window Craft Corner
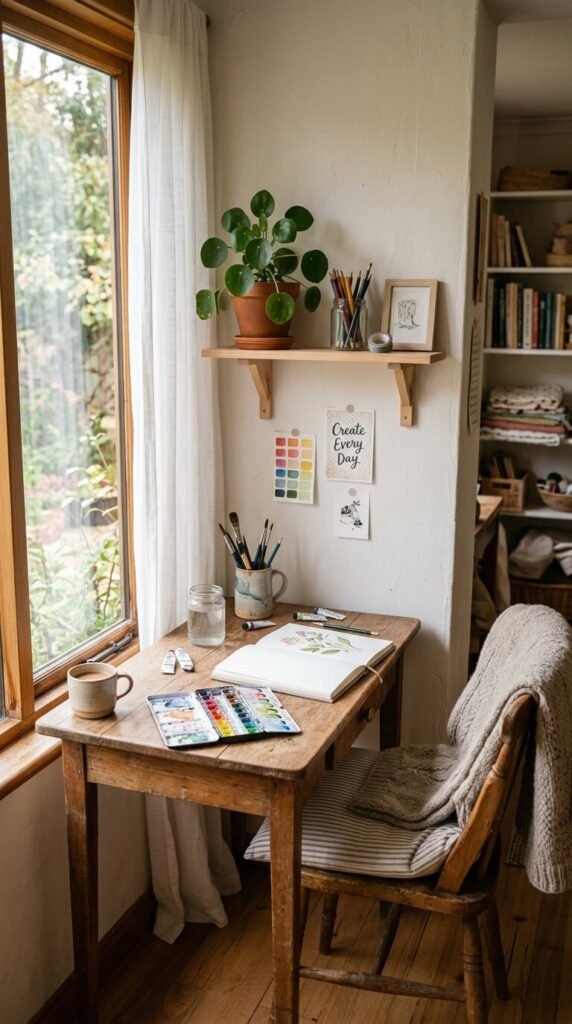
Position your main craft workspace near a window if at all possible. Natural light reduces eye strain and makes colors look true. Even a small table pushed against a window becomes a beautiful dedicated space. Add a floating shelf above for storage. Use a simple desk lamp for evening crafting. This is about placement, not purchasing anything new. Rearranging your room so your main work surface catches daylight is one of the cheapest and most impactful changes you can make.
22. Craft Room Inspiration Board
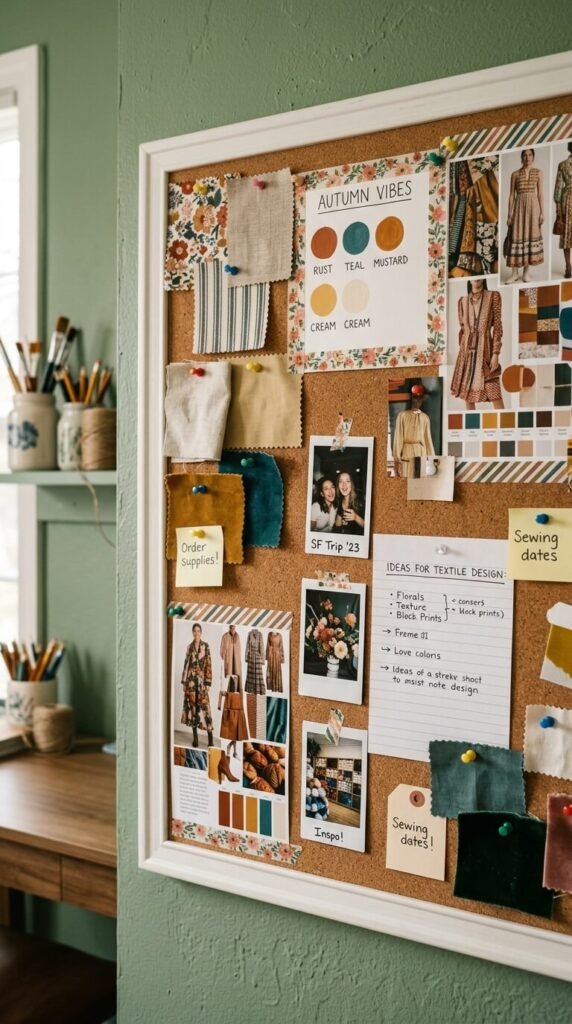
A corkboard or inspiration board keeps your creative ideas front and center. Pin color swatches, fabric samples, magazine clippings, pattern ideas, and project goals. Seeing your inspiration daily keeps you motivated and focused. You can buy a corkboard for under $10 at most dollar or office supply stores. Frame it with washi tape or a painted wood border to make it feel more intentional. Place it at eye level above your desk where you’ll see it every time you sit down.
23. Craft Supply Cart by Project Type
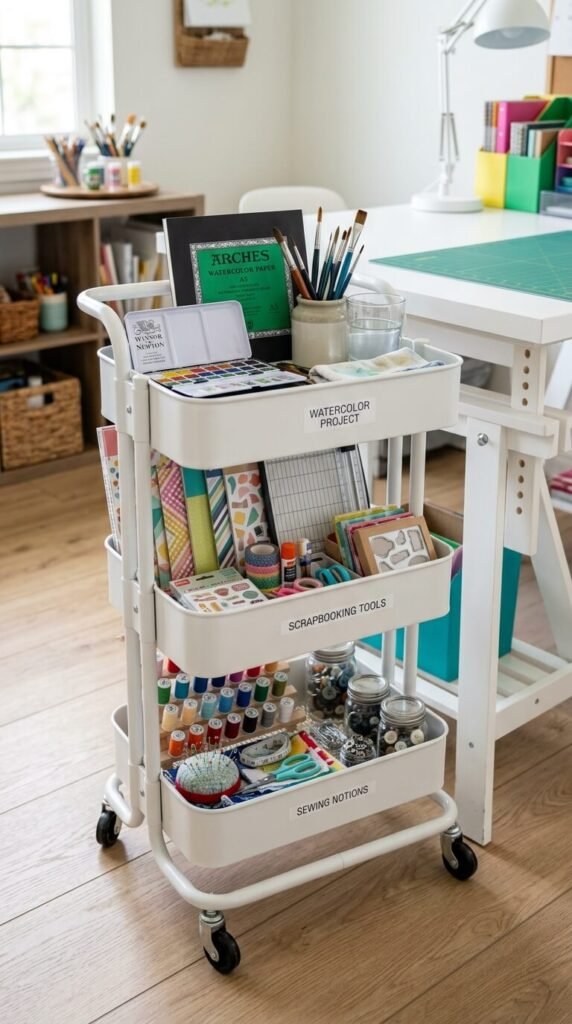
Instead of organizing by supply type, try organizing by project type. Dedicate one rolling cart or shelf zone to each hobby — one for watercolors, one for scrapbooking, one for sewing. Everything you need for that project lives together. When you sit down to work, just roll that cart over. No hunting through mixed bins for the right tool. This method is especially helpful if you juggle multiple hobbies. It saves setup time and keeps you in a creative flow.
24. Over-the-Door Craft Storage
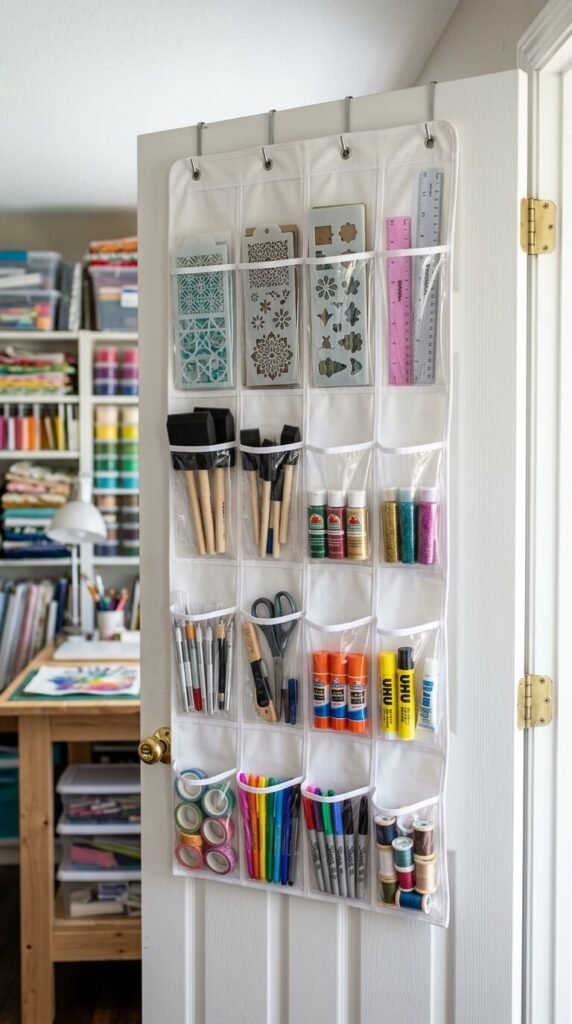
The back of a door is completely wasted space in most craft rooms. An over-the-door organizer turns it into a storage wall. Use a shoe organizer with clear pockets — these are one of the most versatile and affordable storage tools available. Fill the pockets with stencils, small tools, glue sticks, foam brushes, and craft knives. No installation required. Just hang it over the door. A basic version costs $10–$15. It adds significant storage without using any floor or shelf space.
25. Tiered Spinning Lazy Susan
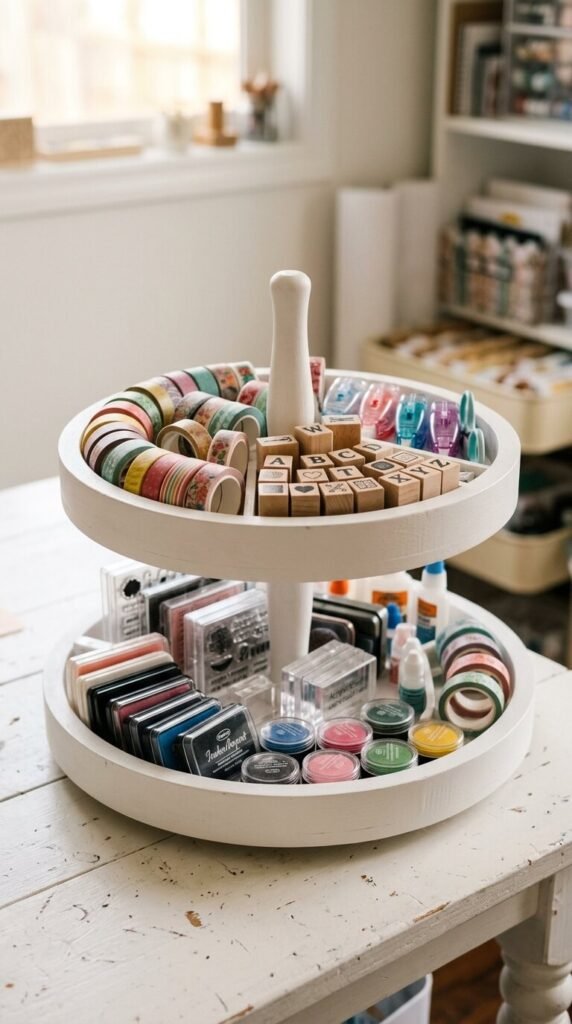
A lazy Susan on your craft desk is incredibly practical. Spin it to reach anything without standing up or shuffling supplies. Use a two- or three-tiered version to hold ink pads, stamps, washi tape, glue, and adhesives. Everything stays within arm’s reach. Lazy Susans are available at kitchen stores, IKEA, and Amazon for $15–$30. They work especially well in corner setups where reaching across the desk is awkward. It’s a small tool that saves time on every single project.
26. Herb Garden-Style Supply Jars on a Rail
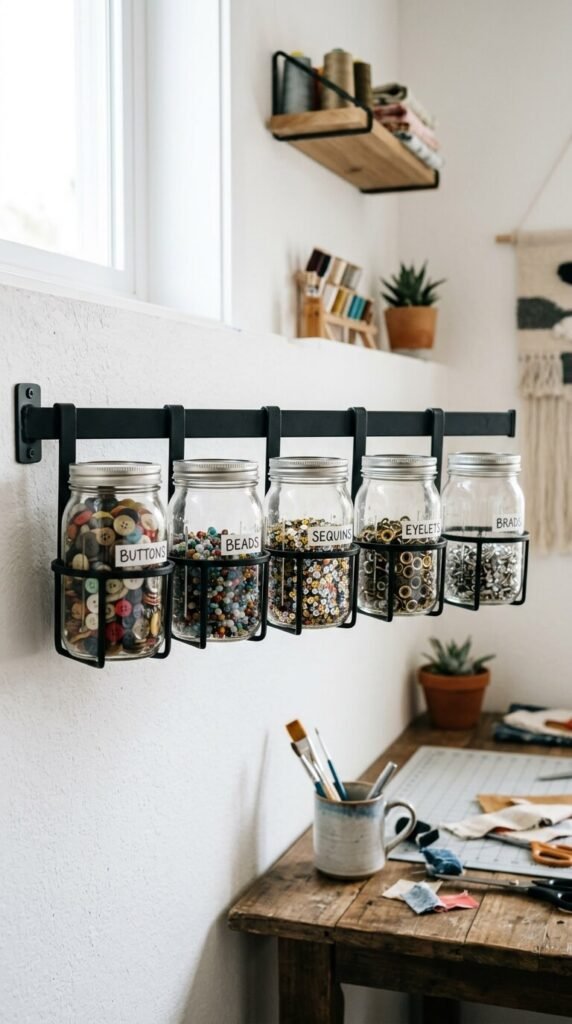
Take inspiration from kitchen herb garden rails and apply the concept to your craft supplies. Mount a horizontal rail on the wall and clip small glass jars onto it. Fill each jar with buttons, beads, sequins, brads, or eyelets. It keeps tiny embellishments organized, visible, and off your desk. This is an easy DIY — buy a curtain rod, S-hooks, and small mason jars. The whole setup costs under $20. It also looks stunning, especially against a white or light-colored wall.
27. Color-Blocked Fabric Storage Wall
If you work with fabric, store it folded or rolled with the end facing out so you can see every color and print. Use open cubbies or shelf slots to arrange your collection in a color-blocked layout — all warm tones together, all cool tones together. It turns your fabric stash into a wall of visual art. Shallow cubby shelves work best. You can build a simple version from wood boards and L-brackets for under $40. The result is stunning and completely functional.
28. Clip-On Task Lighting for the Desk
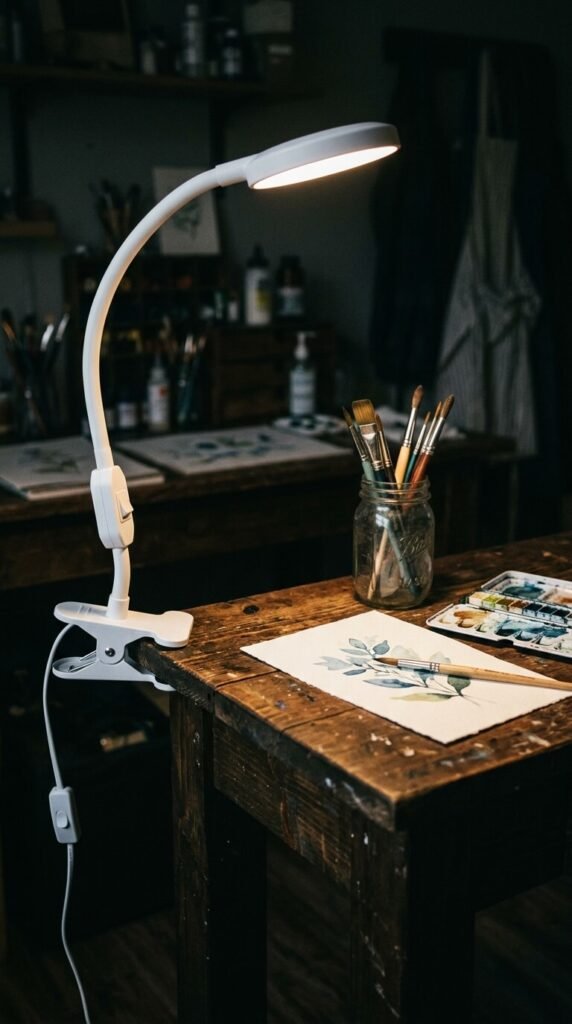
Good lighting doesn’t require expensive fixtures. A clip-on LED task lamp gives you focused, bright light exactly where you need it. It attaches to the edge of your desk and points wherever you direct it. This is perfect for detail work — cutting, stamping, hand lettering, and sewing. Look for a lamp with adjustable color temperature so you can switch between warm and cool light. Clip-on task lamps cost $15–$30 on Amazon. Proper lighting reduces mistakes and makes crafting far more enjoyable.
29. Repurposed Spice Rack for Small Supplies
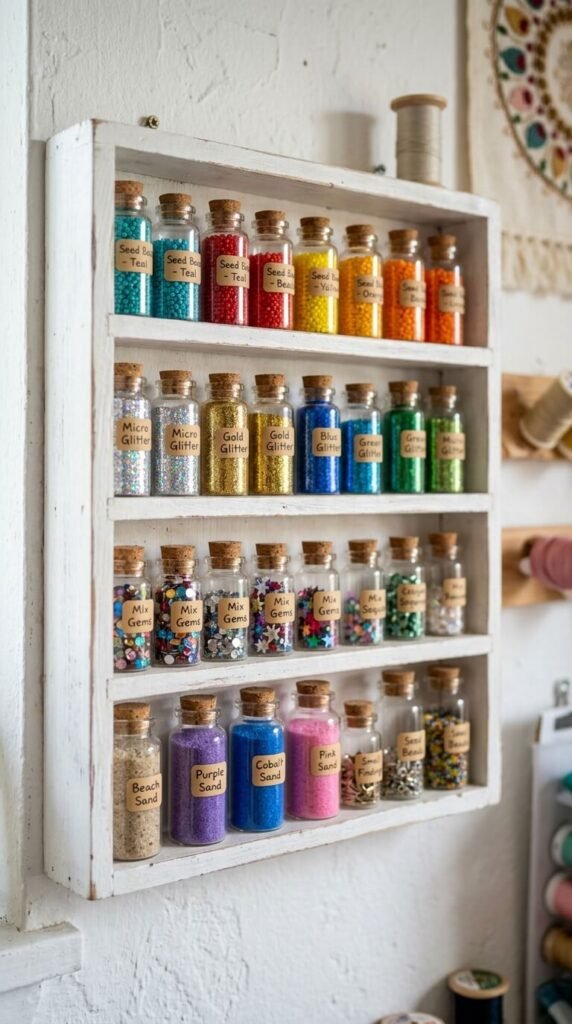
A wall-mounted spice rack repurposed for craft supplies is a brilliant space-saver. Use it to hold tiny glass bottles of beads, glitter, fine sand, or pigment powder. These are all supplies that are easy to lose and hard to store in larger bins. Spice racks are cheap — under $15 at IKEA or thrift stores. Mount it at eye level above your desk. Label each bottle. This works especially well for jewelry makers, resin crafters, and anyone who works with small loose materials.
30. Personalized Craft Room Gallery Nook
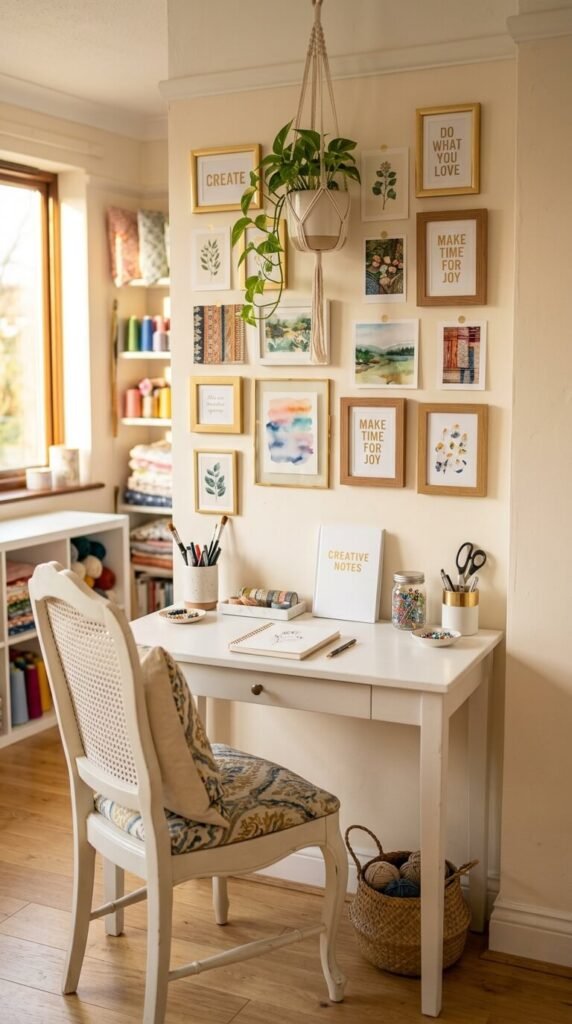
Your craft room should feel like yours. Add a small gallery wall above your desk with framed quotes, your own finished artwork, or inspiration prints. Hang a small plant. Put out a candle. Use a chair you actually love sitting in. These personal touches make your space feel intentional — not just functional. A room you love spending time in is one you’ll actually use. Shop thrift stores for frames, print quotes at home, and display work you’re proud of. Make the space reflect who you are.
Conclusion
Organizing a craft room doesn’t have to be expensive, complicated, or perfect from day one. Start with one idea from this list — a pegboard, a rolling cart, or just a set of labeled mason jars — and see how it changes the way you work. Small changes have a real impact on your creative energy and how often you actually sit down to make something. Every organized space started with a single decision to try something different. Pick your first project, gather what you already have at home, and start building the craft room that makes you want to create every single day.